Updated Nov. 2023
Apple Help is old. Really old. Sometimes I wonder if new developers even know what Apple Help is since it’s not really used as much these days. Most applications in 2020 just open the support page from the developer’s website in Safari. However, Apple’s own applications and some big-name developers still make use of Apple Help by shipping the necessary resources in their app!
It’s probably not worth writing a Help Book anymore these days but it certainly doesn’t hurt to include one. I mean, it definitely has some advantages. For example, your Help Book can be viewed offline since it’s just a collection of HTML pages stored within your app’s bundle. Other advantages include anchors, which is a mechanism to link the Help button in AppKit to specific pages within your Help Book.
You may also want to include a Help Book with your app for the sake of completeness …and to be old school. I often feel those long-time Mac OS X developers appreciate the little things — such as Apple Help Books. So, what do we need to get started?
Well unfortunately, a ton of time. And even more patience. Apple’s own documentation for Apple Help has moved to the documentation archive on their developer site. You’ll find tons of questions on Stack Overflow and other… more questionable sites. Apple did do a minor revision to their documentation back in 2013. 2013!!!
By now, 2020, Apple Help is neglected and well, crusty. Very crusty (no, not that Crusty). It still works but certain parts of it don’t seem to work as well anymore. Not sure why it’s neglected. They advise you include a Help Book in their HIG that was recently published — and they link to the documentation (from 2013). Personally, I think they have a lot of potential and a lot to offer. I just wish this was a component at Apple that would get some attention in both development and documentation.
Before I continue, I want to make sure that you understand some things just don’t work. I don’t know if either I am doing something wrong or it the issue truly is a bug Apple never got around to fixing. For example, only Apple seems to have access to the sidebar button in Apple Help’s toolbar to open a sidebar in their HTML pages.
But at the end of the day, a Help Book is better than No Help Book. So, let’s get started on a simple Help Book for your awesome Mac OS X… errr… macOS app!
One last thing before we continue. Why are we spending time going over a complicated process and why am I spending time writing this article? Well, when I was developing PDX Transit for macOS, I wanted to make sure it included a Help Book to make it feel more native and more OG. I spent countless hours and days trying to piece together all the information from all corners of the internet to build a Help Book. It was super frustrating and excruciatingly time consuming. I don’t want anyone else to feel this way so I hope this speeds things up for the next Mac Developer who wants to include a Help Book with their awesome app!
Getting Started
A Help Book is nothing more than a bundle that resides in your app’s Resources folder. It’s accessible from the Help menu of your app’s menu bar. In fact, any new project will already be set up with this Help menu item but it’s your responsibility to include the Help Book and register it.
In this example, the name of both the project and app is My Great App.
A Help Book is just a bundle that resides in your app. We’re going to begin by adding a new Bundle Target to your Xcode project.
- Select your project in the Project Navigator (sidebar)
- Click on the General tab
- Click on the + symbol under the list of targets to add a new Target.

Xcode will present a template chooser.
- Select the macOS tab
- Filter on “Bundle”
- Select the option “Bundle” and click Next

Give your Target a name. In this case, we’re omitting spaces and appending “Help” to its name.
- Name the new Target, “MyGreatAppHelp” in this sample project example
- Enter “help” for the Bundle Extension field
- Select your app’s project for Project and click Finish
Next, the Help Book Bundle’s info.plist file needs additional, Help Book-only entries.
- Select your project in the Project Navigator (sidebar)
- Select the newly added Help Book Bundle Target from the Targets list, MyGreatAppHelp in our sample project example
- Click on the Info tab

Add the following entries. They’re required so be extra careful and make sure they’re correctly added.
| HPDBookTitle | A human readable title that displays in the Help app’s toolbar. Localized version must be in InfoPlist.strings file relative to the lproj. | My Great App Help |
| HPDBookAccessPath | The initial HTML page for your Help Book and path to the title page relative to the lproj. | index.html |
| HPDBookKBProduct | A KB tag to identify the product | MyGreatApp1 |
| HPDBookCSIndexPath | A generated file for indexing your content and relative to the lproj. | MyGreatAppHelp.cshelpindex |
| HPDBookIndexPath | A generated file for indexing your content and relative to the lproj. | MyGreatAppHelp.helpindex |
| Bundle creator OS Type code | The same for all help components and localizations. | hbwr |
| HPDBookType | Help Book type version number | 3 |
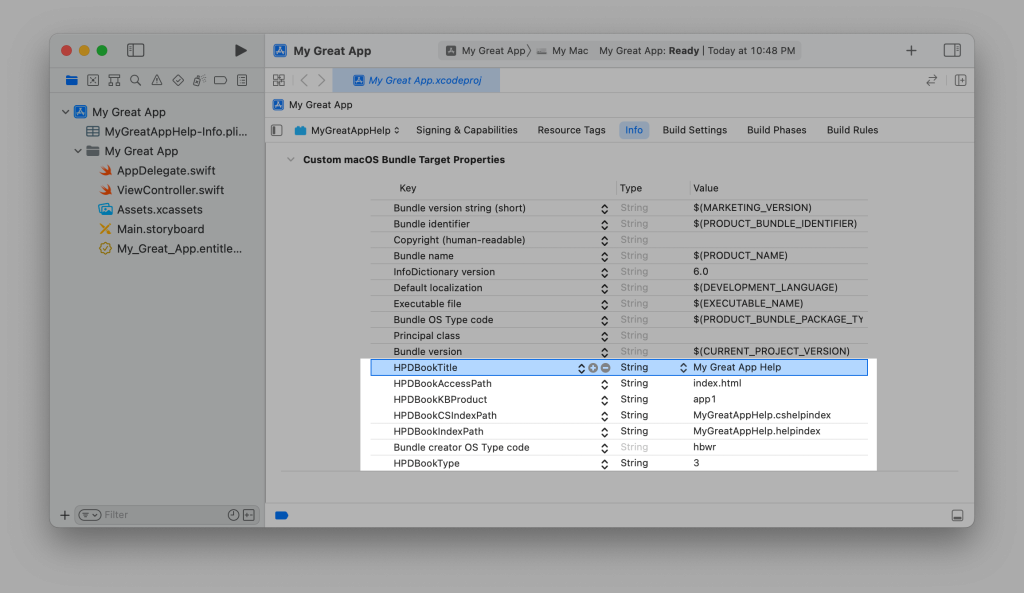
Next, we need to configure the App Target itself to copy this Bundle into the App Bundle at build time. Since the Help Book bundle is required to be in the app, the Help Book Target now becomes a dependency for the App.
- Select the App Target
- Click on the Build Phases tab
- Under Target Dependencies, click the + button and select the Help Bundle target; MyGreatAppHelp in our example sample project
- Under Copy Bundle Resources, click the + button and select Help Bundle, MyGreatAppHelp.help in our example sample project

The Application’s info plist file now needs updating to “know” about your Help Book. This step requires you add to custom entries to it.
- From the Project Navigator, select the Project file
- Select the App Target for the app, in this case, “My Great App”
- Click on the Info tab
- Add the following two entries
| Info Plist Key | Description | Info Plist Value |
| Help Book directory name | The name you chose for your Help Book bundle including its extension. This is also known as CFBundleHelpBookFolder. | MyGreatAppHelp.help |
| Help Book identifier | The bundle extension you chose for your Help Book. This is also known as CFBundleHelpBookName. | com.marioaguzman.MyGreatAppHelp |
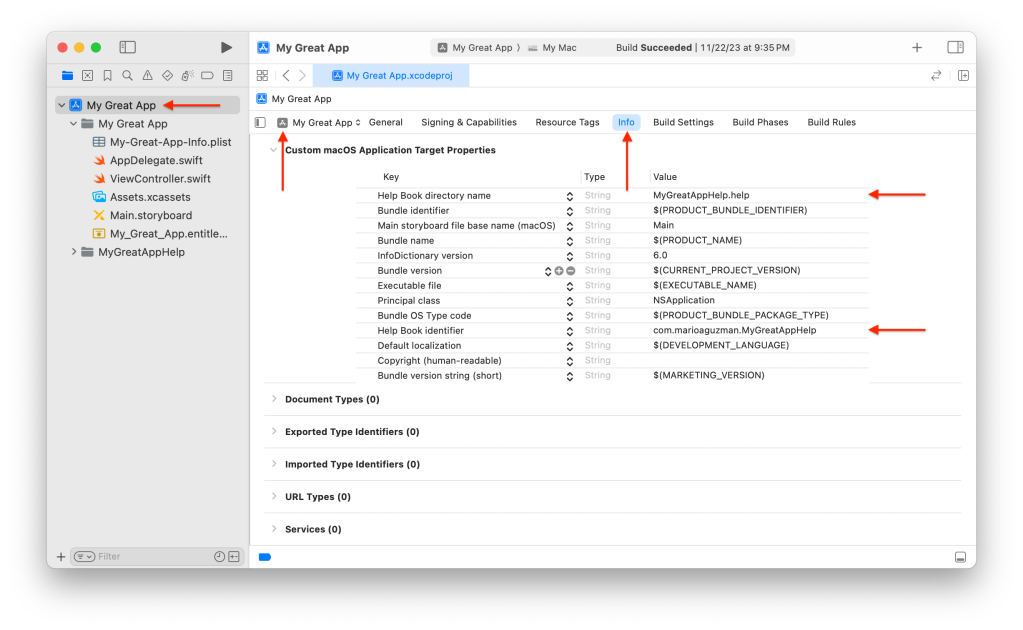
Checkpoint: Build and Run your project. It should succeed and run. If you open the app’s bundle, navigate to Contents > Resources and you should see your Help Book bundle now included. In our sample project case, it would be named MyGreatAppHelp.help.
We’re now ready to add content, such as our HTML, CSS, images, etc. but we should do a bit of housekeeping first to make sure our project is organized. We’ll do this by:
- Create a folder (Group) to hold all our Help Book content
- Move the Info.plist into this group and update any path references to it
- Localize the Help Book so it creates the proper structure for future localization
Start by creating this folder (Group)
- In the Project Navigator, control-click on the project and choose New Group
- Name it something you’d know would be Help Book contents; MyGreatAppHelp in our example sample project
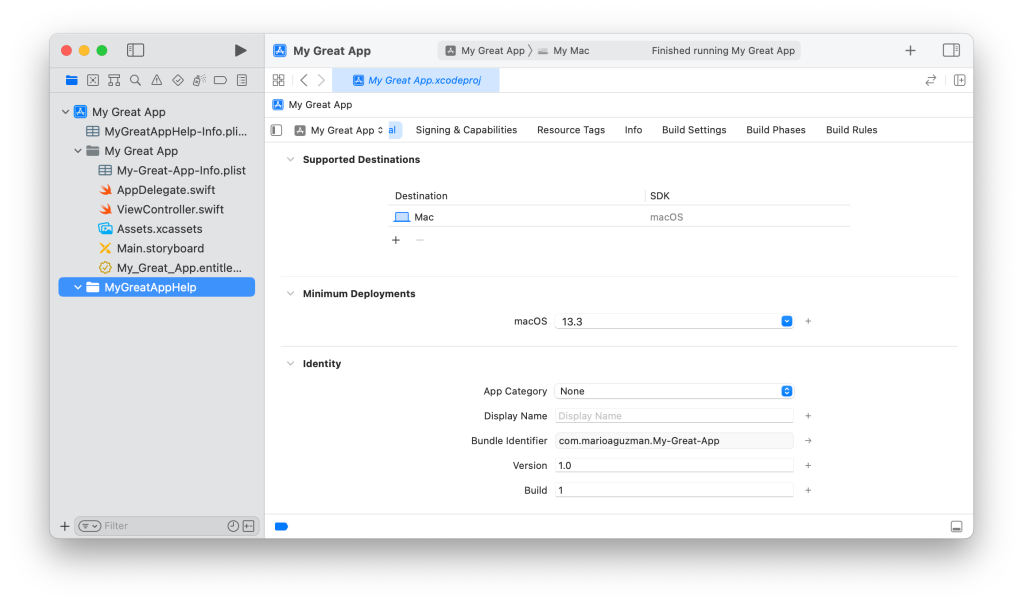
Make sure that this folder is a sibling to your App’s source code folder (group). That is, it resides at the root level of your project.
The Help Book Bundle’s info.plist file was also created at the root level in a previous step, so we should move it into our new folder (group) that was made for any Help Book resources.
Drag the [YourApp]Help-Info.plist file into into your new Help folder (group). In our case, we’re moving MyGreatAppHelp-Info.plist into MyGreatAppHelp (folder).

However, by moving this, the Help Bundle Target will no longer build, thus causing your app to not build (because the Help Book is a required dependency). To fix this:
- Select your project in the Project Navigator (sidebar)
- Select the Help Book Bundle Target
- Click on the Build Phases tab
- Scroll down to the Packaging section (may need to scroll a bit)
- For the Info.plist File entry, update it to be a path through your newly created folder (group). So append the name of your folder followed by a slash “/” to the current value. In our case, it’s now MyGreatAppHelp/MyGreatAppHelp-Info.plist.

The next step is to do a bit more organization but also set the ground work for localization. Even if you’re not planning on localization yet, it will structure your Help Book content into language folders. In this step, it will group our content into en.lproj folders.
- In your Help folder (group), create a new folder (group) and name it Resources

- Control-click on the Resources folder (group) and click New File…
- Click on the macOS tab and filter on “Empty”
- Select the “Empty” option under the Other section and click Next
- Name your file “index.html” and make sure the Help Book Target (MyGreatAppHelp in our sample project) is check-marked; click Create
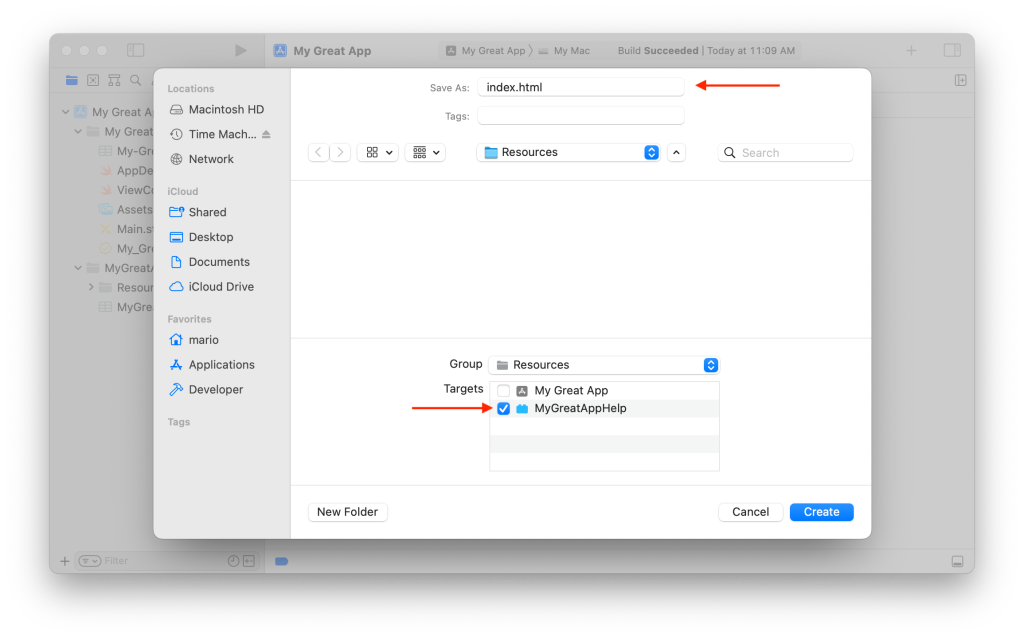
The following screenshot shows a few more other HTML files added but they could be ignored for now.

In order to properly localize these HTML files, we’re going to have Xcode move them into our (currently) singularly localized language: English. Any future localizations will create versions of these HTML files and place them into their own language folders.
- Select index.html
- In the File Inspector, click the “Localize…” button

When Xcode brings up the Alert view confirming localization, select your base language — English in our case and in this example sample project. Click Localize.

When Xcode bundles your Help Book, it will structure it in such a way that versions of your HTML files will be created and copied into their appropriate language folders: en.lproj, es.lproj, etc.
Remember: For any additional HTML files added in the future, repeat these steps of selecting the HTML file and clicking the Localize… button in the File Inspector.
Creating your Help Book Content
Apple Help content is nothing more than standard HTML. The help viewer is nothing more than a standard web view so you’re welcome to use basic HTML, CSS, Scripts, etc. However, there are some specific meta tags and other elements you must use or include in order to have the content work a bit more tightly with Apple Help and your App.
We began this example project by adding a Bundle for our Help Book, linking it to our app, and adding the starting HTML page with the appropriate file structure to help us move forward. In this part, we’re going to add additional HTML pages to our Resources folder (and don’t forget to Localize them).
I’d also advise to include style sheets and scripts with your Help Book rather than loading them remotely. If you want your users to be able to access everything even when they’re offline, they shouldn’t be loaded from your web server.
Let’s begin by creating the initial/landing page to your Help Book. This is the first page page your users will see when opening your Help Book from the Help menu of the app. You must name this html file with the name selected in your info.plist’s HPDBookAccessPath‘s value. In our case, we named it index.html. You can name it whatever you’d like so long it matches your value for HPDBookAccessPath in your Help Book’s info.plist, however, it is typically named index.html.
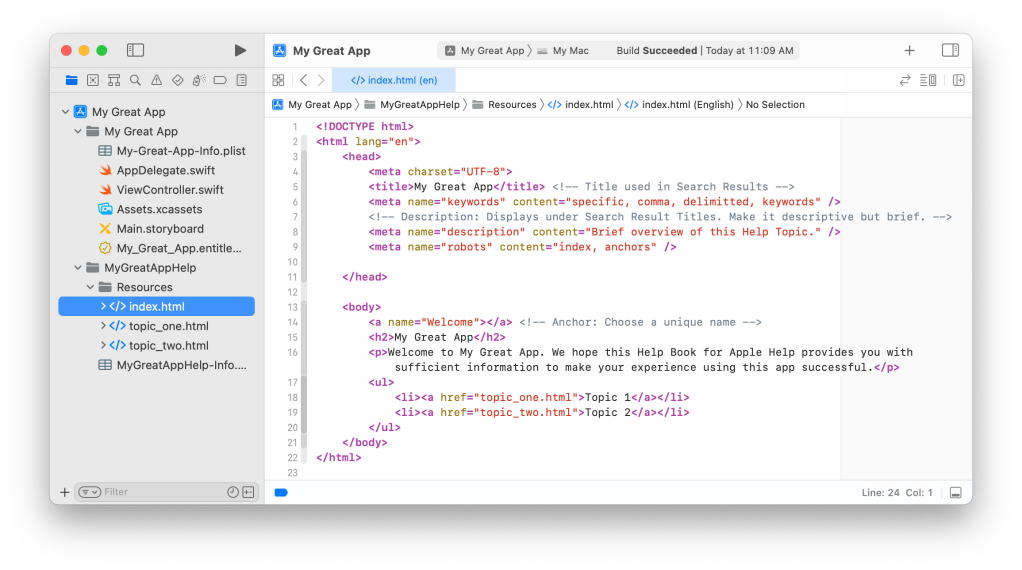
The HTML above is essentially boiler plate for any Help Book page. For simplicity, we’re not including any style sheets or scripts. Let’s go over some things unique or required by Apple Help in your HTML pages.
If you look at the HEAD section, notice the meta tags.
- Meta name Keywords: This is a list of comma delimited words with themes for this help page. This would be different for each HTML page you include in your help book and is used by the Indexer app we will be using later. Use alternate words to your main keywords. (ex: include ‘track’ if ‘song’ is the main keyword used throughout your Help Topic page).
- Meta name Description: This is a brief 1-sentence description of this Help Topic. It displays under the Title for search results in the Help app.
- Meta name Robots: Tells the indexer what to index. Omit the ‘index’ in ‘contents’ if a page shouldn’t be index. If the page is supplementary (i.e. Terms & Conditions, Privacy Policy), you might not want to index. Typically, the landing page isn’t index either but for this example, we will index it.
If you look at the BODY section, notice the anchor tag with a name. This is a very awesome feature of Help Books: anchors. Give each page a unique anchor name. AppKit has support to open your Help Book to specific anchors to give your app better support for contextual help. We will go more into this later.
In this case, we gave it an anchor name of Welcome since it’s our landing page.
Now, add all the HTML files you want to your Help Book and link them however you want. You can see in the sample HTML code above that we link to 3 other pages inside the Body tag. Make sure that each page has:
- a keywords meta tag
- a description meta tag
- a robot meta tag(s)
- a anchor with a specific name
Tired yet? Sorry… we’re not completely done yet. Let’s keep going…
Indexing your Help Book
The app that displays Help Books is pretty powerful in that in can search your Help Book for special content, anchors, etc. and display results along with topic titles and short descriptions. You can also search for topics directly from the Help menu of your app and have results appear in said menu.
For this to work, you need to properly localize your Help Book. Remember when we added both HPDBookCSIndexPath and HPDBookIndexPath to our Help Book bundle’s info.plist? This is where they come to play.
Normally, you’d use Terminal and the hiutil command to index your Help Book but doing this manually every time we update our Help Book is incredibly time consuming and one may even forget to do it. For this reason, we’re going to create a script that runs this every time we build our app (you can also have it run only when you archive the app).
Normally, you’d navigate to the specific localized folder for your Help Book. For example, en.lproj and then run the following commands:
hiutil -I corespotlight -Caf MyGreatApp.cshelpindex -vv .
hiutil -I lsm -Caf MyGreatApp.helpindex -vv .
These two commands will create the two help book index files needed. There’s also a third, very useful command, that can validate your work:
hiutil -I corespotlight -Tvf MyGreatApp.cshelpindex
This will show you via its output what was indexed and how. You will get a printout of all your pages. If a page has the title tag and correct meta tags (listed above), the values should appear each page entry after running this command. This helps you see what will be displayed to the user.
That’s just a description of what these commands do, but we’re going to now set up Xcode to do this for us.
- Select your project in the Project Navigator (sidebar)
- Select the Help Book Bundle from the Target’s list, MyGreatAppHelp in our example sample project
- Click on the Build Phases tab
- Click on the + symbol above the listed build phases
- Name the section “Re-index Help Book” or something similar
You may use the script below as it navigates to the correct place, iterates through the localized languages, and runs the utility to not only index your content but also run the validator.
set -x

cd "${BUILT_PRODUCTS_DIR}/${PRODUCT_NAME}.help/Contents/Resources"

for LANGUAGE in *.lproj;
do
  pushd "${LANGUAGE}"
  hiutil -I corespotlight -Caf "${PRODUCT_NAME}.cshelpindex" -vv .
  hiutil -I lsm -Caf "${PRODUCT_NAME}.helpindex" -vv .
  hiutil -I corespotlight -Tvf "${PRODUCT_NAME}.cshelpindex"
  popd
done
Information: Notice that For install builds only checkbox. If this is selected, it will only generate the help index files when you create an Archive of your app (to notarize, submit to the Mac App Store, etc.)
This may be useful when your Help Book is mostly complete in terms of content but for now, we can leave it unchecked — just note that it will continue to create updated versions of the index files. This may be annoying with Git since it will update the index files every time you build + run your app for testing.
UPDATE FOR Xcode 15: Your script may fail to which means your index files will fail to generate. You may see errors (warnings) after archiving about operations not being permitted because you have no permissions for the directories you’re accessing. To fix this, go to your Target’s Build Settings and search for User Script Sandboxing. Set its value to No. You should now be able to generate your help book’s index files as before.
Validation
Earlier we mentioned one of the commands was for validation. If you want to see the output for this validation:
- Go to the Report navigator
- Click on the latest Build group
- Scroll down to “Run custom shell script ‘Re-index Help Book’ (this is what we named it)

Test it!
From Xcode, build and run your application. Once it is up and running, go to the Help menu and open your app’s Help Book. In our case, it will be Help > My Great App Help.
Uh oh. You might not get what you expect. I know you were expecting to see your landing HTML page from your Help Book but instead you got “The selected content is currently unavailable.” Right? (However, you might also see it but this section is good to review anyway.)

This is because Apple Help hasn’t had a chance to register your Help Book and doesn’t know anything about it. Apple Help seems to like to cache things and works off that cache. So, how do we force it to begin tracking our Help Book but also update subsequent updates of our HTML files?
To do this, we want to run this app from our Applications folder. Placing an app with an updated Help Book in Applications seems to trigger an update to Apple Help.
Let’s begin by quitting our Application or pressing the Stop button in Xcode.
- In the Xcode Project Navigator, right-click on your app that resides in your Products folder.
- Select Show in Finder.
- From the Finder window, drag this app into your Applications folder.
- Go into your Applications folder and open your app.
Now we can go into the Help menu and try again. You should now see your Help Book’s landing page. In our case, using the sample HTML above, should appear like this:
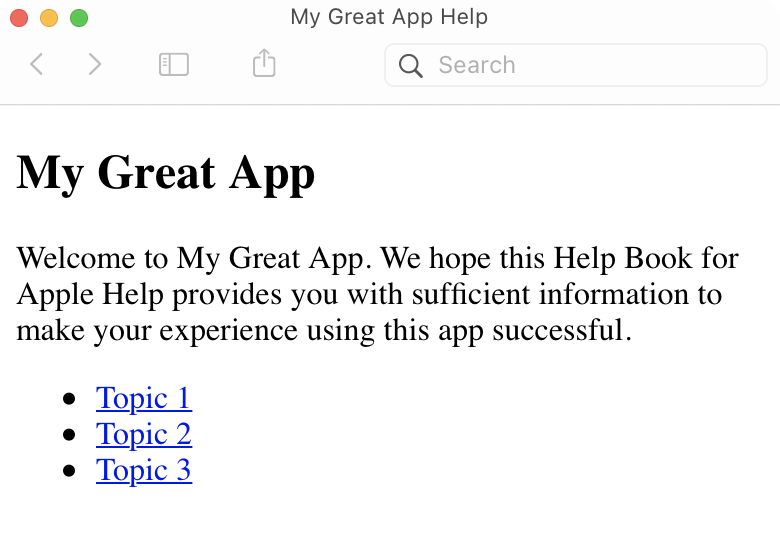
You did it! Your awesome Mac OS X… errr, macOS app now has a Help Book!
Testing the Help Menu
Run your app and go to the Help menu. Usually, you’d just be able to search for all the commands across all your app’s menus to help you locate them. But now, with a properly indexed Help Book, it will also search and surface Help Topics from your Help Book!

Testing the Help app Search
Open the Help app by going to Help > Your App Name Here Help.
It should take you to the landing page of your Help Book for your app. In the Search field in the toolbar of the Help app, search using a word you know you indexed and press Return. Help should bring up search results related to your app.
This is where you will see the brief descriptions you gave your pages. Make sure they’re short and succinct.
Please note that Help takes a very long time to update. The best way I have found to force new Help Book content is to use hiutil to restart the Help system, bring a copy of your app with the new Help Book into Applications, and Logout. Once you log out and log back in, it will take about 5 minutes to get your updates to appear. This is because Help Book content is cached and macOS resorts to that cached version.
Use hiutil -P to shutdown the helpd process and clear all caches the system may have created for your Help Book. Again, this process takes a while to restart and re-cache newly updated Help Books (that reside in your Applications folder). Sorry, I cannot stress this part enough. It requires much patience.
Checkpoint!
Now that you have a working Help Book, you might want to go back and start adding more HTML pages for all topics of your app. Maybe you want to add additional content to existing pages. This is going to be pretty common going forward so lets go over some things you must remember.
- Any updates you want to see during development won’t reflect in Apple Help until you drag your debug output of the app into Applications.
- Always remember to update the .helpindex file whenever you update your Help Book content.
- And finally, remember to keep your Help Index app up-to-date. Apple always seems to include an updated Additional Tools disk image for each Xcode update (including Betas!). Download this from the Downloads page on Apple’s Developer website.
Writing an Effective Help Book
I know I haven’t given you any instruction on how to write or structure your Help Book specific content. That’s really up to you but Apple does offer some guidance here. I’m going to refer you to that because that part is actually quite good.
What I did for my own app was to break down each section of my app into a topic and then into further sub-topics. I also added additional information such as a page dedicated to keyboard shortcuts and system-related features such as Handoff, Dock Menu Items, Touch Bar Support, etc.
Additionally, you may not want to index the landing page and informational pages (ex: Privacy Policy, Terms & Conditions). You may not want these to come up in search results because users typically only search Help to learn how to achieve something in your app.
For more guidance, check out Apple’s Developer Documentation which is complete with illustration and examples.
More work to be done…
Remember our discussion on Anchors? I mentioned that anchors can give your app more contextual help because it opens your Help Book to a specific page. Here’s an example from System Settings’ Appearance pane:

For reference, each HTML page in your Help Book should have a blank anchor tag with a name as such:
<a name="Welcome"></a>
Each name should also be unique so that Apple Help only has one page to open to. No ambiguity!
AppKit gives you two ways to access a specific topic of your Help Book. The first is using the Help styled NSButton and calling up the page programmatically. First, use this Cocoa control:

Set its action or IBOutlet to the following code:
@IBAction func helpButtonAction(_ sender: Any)
{
    if  let bookName = Bundle.main.object(forInfoDictionaryKey: "CFBundleHelpBookName") as? String {
        NSHelpManager.shared.openHelpAnchor("MY_ANCHOR", inBook: bookName)
    }
}
The other hook AppKit has into Apple Help is in NSAlert. NSAlert has a showsHelp property which you can set to true and then set the helpAnchor property to your anchor string. AppKit will take care of the rest by displaying the Help button and opening the anchor when clicked.

let alert = NSAlert()
alert.messageText = ""
alert.informativeText = ""
alert.alertStyle = .warning
alert.addButton(withTitle: "")
alert.addButton(withTitle: "")
alert.showsHelp = true
alert.helpAnchor = NSHelpManager.AnchorName("MY_ANCHOR")
That’s it!
You’ve successfully constructed a Help Book for Apple Help! That’s super exciting in my opinion but the road ahead is still long and arduous. Maintaining a Help Book is tedious and there isn’t much Help on the web. At this point, I’d like to share with you some things I still encounter till this day with no way around them.
- Help Books don’t update automatically. While developing a Help Book, remember to keep moving your debug output into your Applications folder to force Apple Help to update its cached contents. (At least I think it has a caching mechanism.)
- Anchors take much longer to begin working or update. If your anchor doesn’t work right away, give it time. Yes, I know that sounds weird but just give it time. It will eventually work.
- Unless you want to reverse engineer Apple Help, forget about the sidebar button. Maybe if you know or figure it out, please let me know!
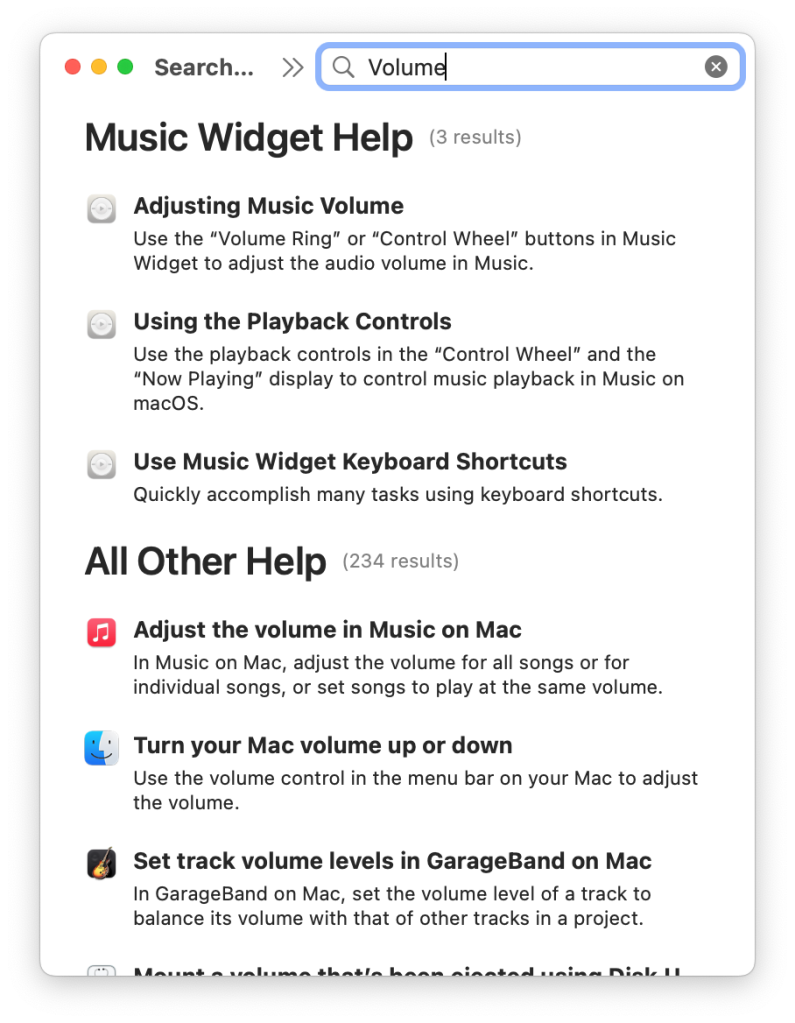
I’d like to leave you with an example of the Help Book for my macOS app, Music Widget.
If you have any questions or wish to reach out to me, contact me via Mastodon or Bluesky @marioguzman.bsky.social.
Localization
Localizing Help Books is as simple as localizing other parts of your application whether they’re strings files, storyboard files, etc.
If you haven’t localized your app, the process is simple. However, this article will only go through enabling Localization at the project level followed by localizing the HTML files. Refer to the Apple Developer website for localizing and internationalizing your application itself.
- Select your project in the Project Navigator (sidebar)
- Select your Project (It’s listed above the Targets list)
- Under Localizations, click the + symbol to add another supported language; we’re going to select Spanish in this case

The next step, Xcode will ask which files you want to localize. We’re just going with the Help Book contents in this article. Click Finish. Refer to the Apple Developer website for localizing and internationalizing your application itself. You can always select more files to localize later. In this example sample app, checkmark the HTML files.

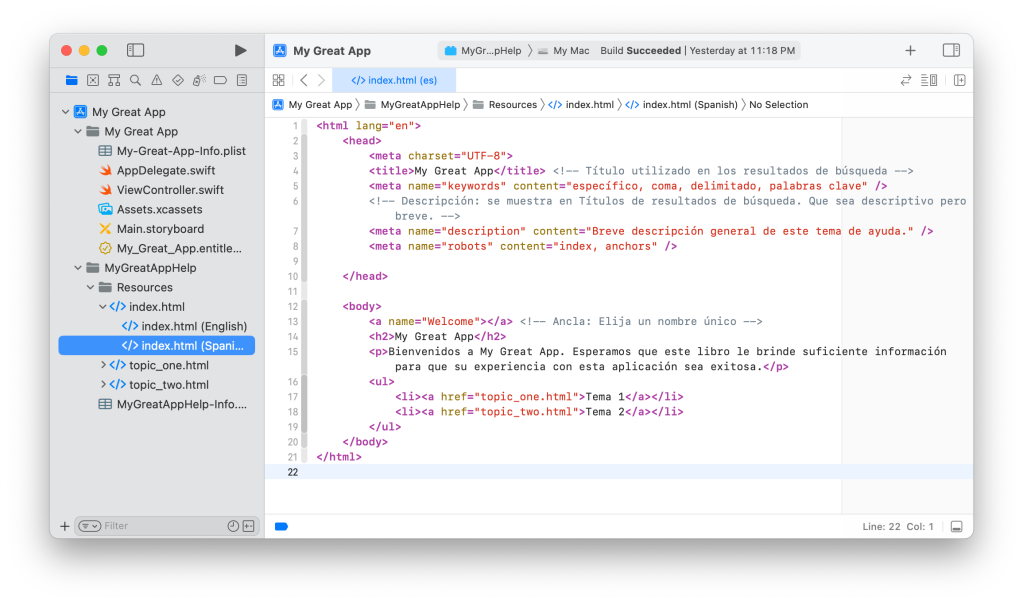
You’ll notice that your HTML files now have a disclosure triangle. This means that the file has more than one localization — expanding it will reveal each localization.
Information: When you add additional languages, you will need to select the base HTML page and checkmark the new language from the File Inspector under the Localization section.
Selecting the localized HTML for another language allows you to translate it or you may also export your localization for others to localize for you. Again, refer to the Apple Developer site for more information.
Refrain from translating the HTML file names, anchors, and meta tag for robots. These are not user facing and would break or make their purpose more complicated to use. The title, description, user-facing content, and keywords should be localized. Remember, keywords are used by your users to search for specific content.
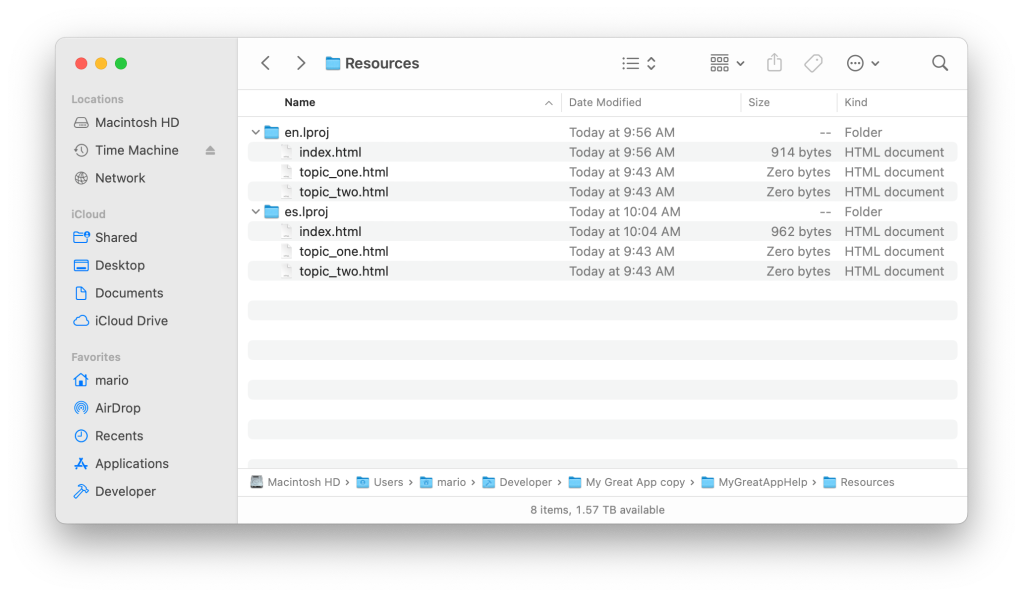
If you crack open the Help Book bundle from your application now, you’ll notice all the localized versions of your content within their correct lproj folders.
Additional Content
What to include a Mac Help Book to your Mac Catalyst project? Check out Dave Rahardja’s GitHub public sample project.
You can also download the Sample Project created and used for this project here: My Great App. (it’s a Dropbox link)
Acknowledgements
I’d like to thank Chris Davis for his Stack Overflow post on proper indexing of Help Books. I’d also like to thank Dave Rahardja for helping me update this document by creating a Bundle using Xcode and creating the script that creates the index files for each localized Help Book. Thanks a million!


I wonder: will .help bundles anywhere on your volume always be automatically registered with macOS, and thereby be available for access in HelpViewer, even standalone .help bundles? Or do they have to be nested in an app’s Resources folder? If the latter is the case, is there maybe a macOS built-in way to manually register a standalone (i.e. not nested) .help bundle with macOS in Terminal? Reason: I’m sometimes creating Platypus apps or (shell) scripts that run in BitBar, and while I could always just include a button or menu command that runs `open -a HelpViewer /foo/myApp.help`, it would be nice to have the help available in HelpViewer by default with something like `helpregister ~/Library/Application\ Support/myApp/myApp.help`. Do you by chance have any information on that? PS: I will definitely ask the Platypus developer to include support for .help in Resources, but that wouldn’t cover standalone or BitBar scripts.
LikeLike
I went through the tutorial as described twice, and even had a friend go through it, but we can’t get it to work.
Even after doing everything exactly as described, with the indexing script showing no errors, we still get the “Help isn’t available” popup… does anyone know what might be wrong?
LikeLike
“Unless you want to reverse engineer Apple Help, forget about the sidebar button. Maybe if you know or figure it out, please let me know!”
Google “window.HelpViewer.showTOCButton”.
LikeLike
Awesome Job. How do we get the table of contents sidebar?
LikeLike
This is a great article covering Mac Help, well written and easy to follow, I really appreciate your sharing. Thanks to this, I was finally able to get help working in my own Mac App.
However there are still a few gaps that I had to figure out with the archived Apple documentation. You show an example of your html file, but you don’t mention what directory it exists in (in the English case it goes in the English.lproj directory). Also, you didn’t mention if you put the resources in Xcode and if so what directory structure you used (in the simple case I added the .help bundle directory to the root of my product branch, which automatically added it as a product resource. Later I figured out I could put the whole directory structure in so I could edit the files within Xcode). Hopefully that will help others who missed a few steps.
Thanks Again!
LikeLiked by 1 person
Thanks! I guess in my head I figured that the screenshots were enough to show where the Help bundle should go but you’re right in that it should be explicitly called out. I have updated that. I have also called out where your HTML files should go (in your localized folders).
LikeLike
This is a great post. I went through adding a help book to a macOS app years ago and had to figure out a lot of this by trial and error, and even with that I couldn’t get everything to work like I wanted. I wish I had been able to read this post back then!
LikeLike
It was the same for me. Trial and error. Missing pieces. Etc. I hope this helps someone else so they’re not having to piece together from all corners of the internet. 😊 cheers!
LikeLiked by 1 person
Great tutorial!
Maybe you can point me into the right direction. I have an app with an extension and need to share the help file between both. So, I have a shared framework and want it to include the help file. But how can I share it to both apps? Whatever I write into the Info.plist file of my apps, Help isn’t working.
LikeLike
This is the nearest I’ve got to implementing a help book and I’m truly gratefull. I’ve followed your instructions and double checked my efforts several times. but it’s not working for me. Could this be because something has changed in Xcode 12.5 or macOS 11.4? I’ve even deleted the entire ~/Library/Caches/ contents, rebooted, re-built, plus several other ideas – all without success. The Help App loads OK and displays a blank page for a few millisecond, but then the “The selected content is currently unavailable” page takes over. Please can you offer a solution?
LikeLike
When you run from Xcode, the app shows up in your Dock. Right-click on it and say “show in Finder.”
Take that and drag it to your main Applications folder and open the app. Not sure if you tried this. It takes a least one time doing this for it actually work in my experience. Have you tried this?
LikeLike
Thanks Mario, but yes I have tried this several times. Unfortunately, it just isn’t loading. Anymore suggestions?
LikeLike
Perhaps I should mention my app isa SwiftUI app – Swift 5.4.
LikeLike
I seem to have found a solution and think it has to do with localisation and that the ‘English.lproj’ is depreciated. Simply rename this folder to ‘Base.lproj’. As I’m only planning for my English language, it doesn’t appear to matter if ‘Use Base Internationalization’ is checked or not. P.S. I looked into contents folder of several apps, including the Apple one, and all are using different methods – probably much more modern.
LikeLike
I’m able to get my help file to show in the help viewer, I just can’t seem to search it, either from inside the help viewer, or the search within my app Any ideas?
LikeLike
This tutorial helps me along some apps in the past. Updating to 12.0.1 all my help books are empty and white. All .help folders aren’t a bundle any more.
Dies someone know how to do Help Books in 2021?
LikeLike
I worked through this, but when I got to the step about renaming MyGreatApp to MyGreatApp.help, the finder renamed it without a prompt and didn’t change the icon. Get Info still shows the type as Folder. This is with OSX Monterey
LikeLike
Thank you!
LikeLiked by 1 person
This works great, thank you very much!
LikeLike
Maybe this will help someone else: I can make changes in the HelpBook, run the app in Xcode and see the changes right away IF you change the build directory to be somewhere approved by the system for HelpBook to access.
In my case, I didn’t have anything else in ~/Applications, so I set Preferences > Locations > Derived Data to “Custom” and selected my user’s Applications folder, and voila! Every time I launch my HelpBook is the latest and greatest.
LikeLiked by 1 person
Very awesome. Thank you so much for writing this. It’s worked great.
LikeLike
(Oops, posted it in the wrong spot)
I went through the tutorial as described twice, and even had a friend go through it, but we can’t get it to work.
Even after doing everything exactly as described, with the indexing script showing no errors, we still get the “Help isn’t available” popup… does anyone know what might be wrong?
LikeLike
Off the top of my head…
1. When you run your application, can you crack open the bundle and see if the help bundle is in it?
2. Move the application into your Applications folder and restart your Mac. You may have to wait a few minutes after restarting. But that should help. I don’t believe the Help Viewer will cache your help book if it’s elsewhere.
LikeLike
Hey, thank you very much for the fast reply!
The bundle is in the app, and it still doesn’t work even when moving the app and restarting. You can see these pictures to confirm:
It even includes the index files.
LikeLike
My sample project works for me. Give this a shot.
https://www.dropbox.com/scl/fi/vwehmhultbd5ikh0kht10/My-Great-App.zip?rlkey=2b08a7arsfv2p9agwycoy6rsl&dl=0
LikeLike
@Mario. Is this issue occurring because the OP might have missed to add CFBundleHelpBookFolder and CFBundleHelpBookName in the Info.plist of the app target
LikeLike
When I try to build after adding the hiutil script (“Test it!” section) the build fails with multiple errors (“Sandbox: hiutil(73870) deny(1) file-read-data”). This is with Xcode 15.0.1 on macOS Ventura 13.6. I have the code signing set to automatic, “Sign to run locally” on everything. Automatic provisioning.
LikeLike
@Mario. I noticed that the article does not mention to add CFBundleHelpBookFolder and CFBundleHelpBookName in the Info.plist.
Does the help work without adding it?
LikeLike
Shouldn’t need them. I am able to still run this project and the Help Book works. Although I do have to do what I describe above about moving to Applications and also logging out and back in to kick the Help Viewer cache it. You can try it out for yourself here.
https://www.dropbox.com/scl/fi/vwehmhultbd5ikh0kht10/My-Great-App.zip?rlkey=2b08a7arsfv2p9agwycoy6rsl&dl=0
LikeLike
@Mario. I just tried running the Xcode project shared in the link above. I noticed, the Info.plist does contain CFBundleHelpBookFolder and CFBundleHelpBookName
LikeLike
You’re right. I am not sure how I missed that — perhaps looked at the info plist for the help bundle instead? Anyway, thanks for catching this. I have updated the article above along with adding a new screenshot. You can do a search on the page for either CFBundleHelpBookFolder or CFBundleHelpBookName to jump to that section. I must have accidentally deleted this section because I re-wrote this article earlier this year for simplicity. I did a lot of changes.
LikeLike
@Mario. I just tried running the Xcode project shared in the link above. I noticed, the Info.plist does contain CFBundleHelpBookFolder and CFBundleHelpBookName
LikeLike
Thank you so much for taking the time to write this article. I really wanted to create a Help Book for my Mac app, and I was about to give up and just add a link to my website when I stumbled upon this article.
LikeLike
I’m currently porting my app from Windows to macOS and I’ve been debating using the Apple help system. I have a PDF file for the Widows version and I could just make it work for both platforms in the one file. But now that I see this post and all of this info, I’m interested in maybe going old-school with the mac app. If anything, this gives me a framework for localization that I would not have using a Word doc and the PDF from it. Thanks for providing so much info about this!
LikeLike